10 iPhone Camera Tricks Professionals Use That Apple Never Put in the Manual
You’ve been using 10% of your iPhone’s camera power. Here’s what Apple didn’t tell you.
Apple sells you a thousand-dollar camera phone, then hides the best features behind settings screens you’ll never find on your own. Meanwhile, professional photographers are capturing magazine-quality shots with the exact same device you’re holding.
The gap isn’t talent. It’s knowledge.
The world captures 1.81 trillion photos annually, with 93% taken by smartphones. The accessibility and quality of smartphone cameras have made them the primary tool for photography, far outpacing traditional cameras.1 The iPhone 13 was the most popular photo-taking device on Flickr over the last year, and Apple iPhones took the first nine spots out of the top 10.2
Think of your iPhone camera like an iceberg. Apple shows you the tip—the shutter button, the zoom slider, maybe Portrait mode if you’re lucky. But 90% of the power sits hidden below the surface. Professional photographers dive deep into those hidden settings every single day.
Smartphones capture around 92.5% of all photos, with 1.8 to 2 trillion photos taken on mobile annually—that’s 5 billion photos captured daily and 57,246 every second.3
According to recent industry data, nearly 15% of photographers now mix smartphone photos with shots from regular cameras, up from 5% in 20243—proving that iPhone photography has crossed into professional territory. The 2026 filmmaking landscape shifted dramatically when Danny Boyle’s 28 Years Later was shot at least in part using iPhones, showing that “shot on iPhone” can be a production decision, not just marketing4.
This isn’t about buying expensive apps or accessories. These are built-in features that Apple included but never explained. Once you know where to look, your photos will immediately stand out from the 5 billion snapshots everyone else posts daily.
Ready to unlock what you’ve been missing? Let’s dive into the iPhone camera tricks that separate amateur snapshots from professional work.
1. ProRAW Mode Gives You DSLR-Level Editing Control (Hidden in Settings)
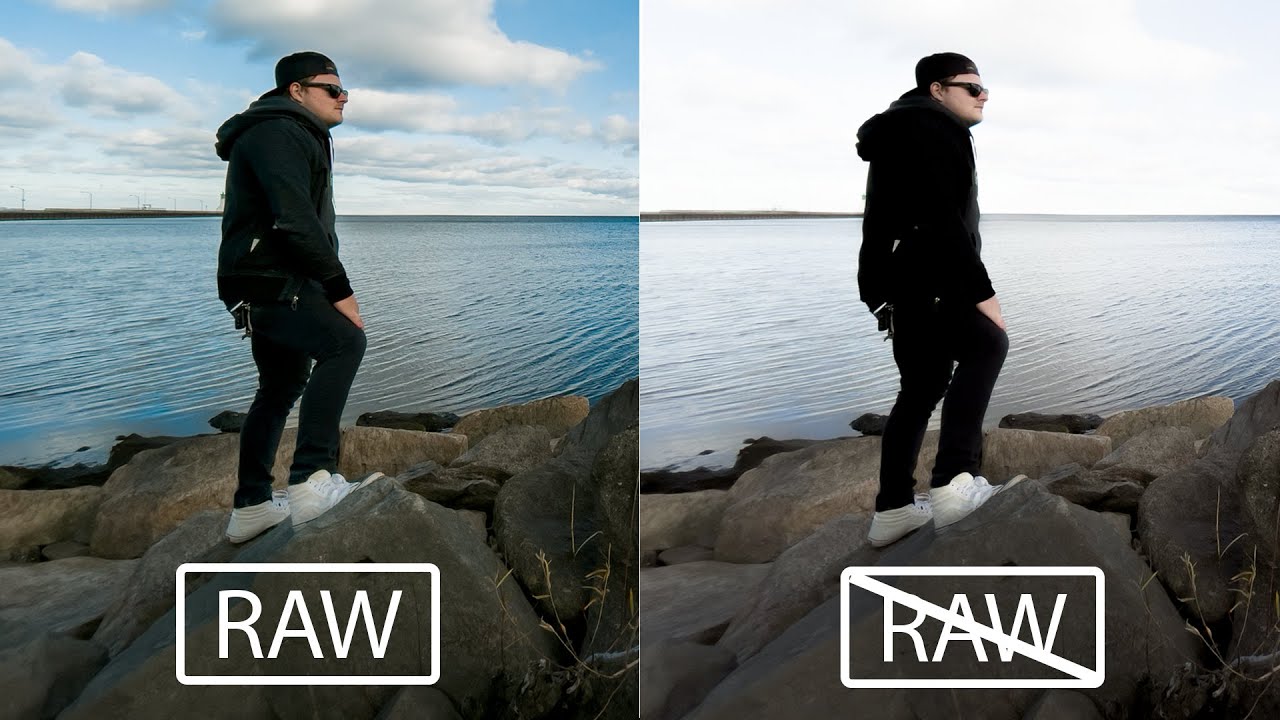
iPhone camera settings for photography reach their peak with ProRAW, a goldmine of data that captures up to 48MP images5. Most people shoot in standard JPEG mode without realizing they’re throwing away 90% of the image data their camera actually captured.
ProRAW is Apple’s version of the RAW format professional photographers demand. ProRAW retains unprocessed data from the image sensor, giving you more to work with when editing white balance and exposure. In comparison, the JPEG format discards a fair bit of data to compress the file, so you have less flexibility when editing.6
Think of it like cooking. A JPEG is a pre-made frozen dinner—edible, but you can’t change the recipe. ProRAW is fresh ingredients. You control the final flavor.
How to enable ProRAW shooting (Apple buried this deep):
- Go to Settings > Camera > Formats
- Toggle on “Apple ProRAW & Resolution Control”
- Set the default Pro Default to ProRAW Max (up to 48MP)5
- Open Camera app and tap the RAW button at the top to activate it
Why professionals use this iPhone camera trick:
ProRAW files hold detail in shadows and highlights that standard photos lose forever. You can recover blown-out skies, brighten dark corners, and adjust colors without the image falling apart. Sliding the exposure down by -0.3 or -0.7 manually creates much more “moody” and professional images5 when you have ProRAW data to work with.
The catch? An unedited ProRAW file can take up to 60MB, compared to 9MB for an edited JPEG6. You’ll burn through storage fast. But for your best shots—the ones you actually care about—the editing flexibility is worth every megabyte.
Best for: Landscape photographers who need to recover highlight and shadow detail, portrait photographers who want perfect skin tones in post-processing, and anyone serious about editing their iPhone photos. As of 2025, almost 86% of photographers use iPhones for everyday photos3, and ProRAW is why many professionals chose iPhone over Android.
Hours saved per week: 3-4 hours of fighting with blown-out highlights or crushed shadows in editing. ProRAW captures it right the first time.
2. Manual Exposure Lock Stops Your iPhone from Ruining Perfect Lighting
Your iPhone constantly adjusts exposure as you move the camera. This automatic behavior destroys consistency and ruins shots where you’ve found perfect lighting.
When you engage the iPhone focus lock, you can enter manual exposure mode. To manually change the exposure, just swipe up and down on the screen. Going up lightens the image; going down darkens it.7
Here’s the iPhone camera trick Apple should teach everyone but doesn’t:
- Tap and hold on your subject until you see “AE/AF LOCK” appear
- A yellow box confirms the lock is active
- Now drag the sun icon up or down to manually adjust brightness
- Move your camera freely—exposure and focus stay locked
To lock focus and exposure, tap and hold until “AE/AF Lock” appears. This feature is especially useful in challenging lighting conditions or when capturing moving subjects.8
Real-world scenarios where this iPhone camera trick saves your shot:
Shooting someone in front of a bright window? Lock exposure on their face so they don’t turn into a silhouette. Photographing a sunset? Lock exposure on the bright sky so your iPhone doesn’t over-brighten everything trying to “help.” Taking multiple photos in the same lighting? Lock it once and every shot matches perfectly.
Maybe that beautiful dark blue sky keeps getting washed out because the iPhone insists on correctly exposing the face of the human in the foreground, when you’d prefer to see the person in silhouette (or vice versa).7 Manual exposure lock gives you creative control instead of fighting the camera’s assumptions.
Common mistake to avoid: Don’t forget to unlock when you move to different lighting. Tap anywhere on screen to release the AE/AF lock, or your exposure will be wildly wrong in the new scene.
Best for: Portrait photographers, sunset shooters, anyone photographing subjects with strong backlighting, and content creators who need consistent exposure across multiple shots.
Hours saved per week: 2-3 hours of editing inconsistent exposures and fighting with automatic adjustments that ruin your creative vision.
3. The Hidden Level Tool Guarantees Perfectly Straight Horizons Every Time
Nothing ruins a good photo faster than realizing it’s crooked. You frame the shot carefully, snap the picture, and only notice later that the horizon is tilted or the building leans at an odd angle. By then, it’s too late to retake it.9
Your iPhone has a built-in solution hiding in the camera settings that most people never discover. The level feature displays on-screen indicators that show exactly when your iPhone is perfectly straight.9
How to activate the hidden iPhone camera level:
- Open Settings > Camera
- Look for the Level option in the Composition section. Toggle Level on.9
- Open your Camera app and point it at any scene. You’ll notice crosshairs or lines overlaid on your screen that move as you tilt your iPhone. When the two crosshairs align perfectly and both turn yellow, your iPhone is level.9
Enabling the grid feature also activates the leveling tool. This tool helps you take level photos when shooting straight up or down. It’s perfect for food photography and still life photography where you need to shoot from above.10
Three shooting situations where the level tool transforms your iPhone camera work:
- Landscape photography — Crooked horizons scream “amateur.” The level ensures your seascape or mountain shot looks professional.
- Architecture photography — Buildings should stand vertical, not lean. The level catches what your eye misses when you’re focused on framing.
- Overhead food shots — When your iPhone is parallel with the ground or ceiling, the crosshairs merge into a single yellow cross10, guaranteeing your flat-lay looks pro.
The best part? The level stays active whenever you use the Camera app. It appears in Photo mode, works in Video mode, and even functions in other camera modes.9 Once you enable it, it’s always there helping you.
Best for: Landscape photographers tired of crooked horizons, architectural shooters, food bloggers, real estate photographers, and anyone who’s ever wasted time straightening photos in post.
Hours saved per week: 1-2 hours you’d otherwise spend cropping and rotating images in editing, plus the image quality you lose when fixing crooked shots.
4. Volume Buttons as Shutter Release Stop Camera Shake Blur Instantly
The most underused iPhone camera trick is literally in your hand right now. Using the volume buttons as a shutter release may sound simple, but it can make a big difference in capturing sharp and stable photos. Instead of tapping the screen, you can easily press the volume buttons to take a photo, which helps reduce camera shake.11
When you tap the on-screen shutter button, you’re pushing against the phone. This micro-movement blurs your photo, especially in low light where the shutter stays open longer. The volume buttons can act as a dedicated shutter button, allowing for better control and stability while taking photos. So, the next time you’re out shooting, don’t forget to incorporate the volume buttons into your technique.11
Advanced techniques professionals use with volume button shooting:
- Hold iPhone with both hands for maximum stability
- Press volume button smoothly—don’t jab it
- Use either volume up or volume down (both work identically)
- Works with wired earbuds too—earbud volume buttons trigger the shutter remotely
There’s a few different ways to take photos with the iPhone camera. The shutter button is visible on the camera screen, or you can use the phone’s volume buttons to snap pics. Another option is to tap and slide the button to the left, which will take multiple photos for however long you press the shutter.6
Why this matters more than you think:
Low-light photography depends on this iPhone camera trick. When your shutter speed drops below 1/60 second, even tiny movements blur the image. The volume button lets you trigger the shot without touching the screen or moving the phone. Combine this with propping your iPhone against something stable, and you’ll capture sharp night photos that would otherwise be impossible handheld.
Burst mode makes it easier to photograph moving subjects or take multiple photos so you have more to work with. Burst works with both front and rear-facing cameras, and sends photos to a separate Burst folder.6 To use burst mode with volume buttons, just hold the button down.
Best for: Night photographers, anyone shooting in dim restaurants or bars, action photography where you need burst mode, selfies where reaching the screen button is awkward, and landscape photographers using a tripod substitute.
Hours saved per week: 30 minutes of frustration with blurry photos, plus the time you’d waste retaking shots that came out soft.
5. Camera Control Button on iPhone 16 Unlocks Touch-Sensitive Pro Controls
Apple’s latest iPhone 16 models include a new Camera Control button located on the lower right-hand side when holding the phone in portrait mode. The new button aims to make it easier to adjust photography settings when shooting with the iPhone in both portrait and landscape orientation.12
This isn’t just another button. The dedicated Camera Control button is a game-changer. It’s not just a shutter. It’s a touch-sensitive trackpad.5
What the Camera Control button does (three pressure levels):
- Light press — Engages a haptic click that allows for adjusting things like manual exposure and zoom, thanks to a handy sliding interface that operates similarly to a camera dial12
- Full press — Takes a photo instantly
- Press and hold — Records video continuously
Light Press locks focus and exposure (AE/AF Lock). Double Light Press opens a small menu for Zoom, Exposure, and Depth. Slide adjusts the selected setting.5
Pro tip that Apple barely mentions: Set your “Double Light Press” to Exposure. The iPhone often over-brightens scenes. Sliding the exposure down by -0.3 or -0.7 manually creates much more “moody” and professional images.5
Five Camera Control settings you can adjust without ever opening menus:
- Exposure compensation (brighten or darken)
- Depth adjustment for Portrait mode
- Zoom level (continuous or stepped)
- Camera selection (switch between ultra-wide, wide, telephoto)
- Photographic Styles (change the look instantly)
By default, using the Camera Control button in the Camera app engages Clean Preview mode. This option hides everything in the Camera UI when the Camera Control button is lightly pressed, so you don’t need to worry about accidentally touching camera lens adjustments while shooting. Another advantage is that it removes all distractions from the screen.12
The Camera Control button finally brings DSLR-style dials to iPhone photography. The iPhone’s Camera Control is customizable, and you can set it to open a third-party camera app. Go to Settings > Camera > Camera Control > Camera, under Launch Camera. Select which camera app you want the Camera Control to open.13
Best for: iPhone 16 owners who shoot in rapidly changing light, landscape photographers who need quick exposure adjustments, and anyone frustrated by fumbling through menus while the perfect moment passes.
Hours saved per week: 2-3 hours of fiddling with on-screen controls and missing shots while adjusting settings manually.
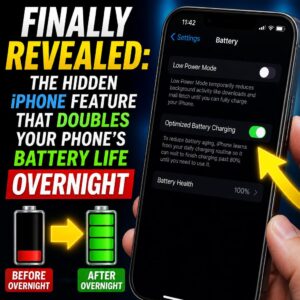
6. Preserve Settings Stops Your iPhone from Resetting Everything You Just Changed
You finally dial in the perfect camera settings for your shoot. Then you close the camera app, and your iPhone wipes everything back to default. Maddening.
Switch on the Preserve Settings option, which prevents the phone from switching into still camera mode whenever you shut the screen. This feature lets you choose which settings to preserve, with a description of each setting and how it usually resets.6
Here’s the iPhone camera trick that stops this nonsense:
Navigate to Settings > Camera > Preserve Settings. You’ll see options most people never discover:
- Camera Mode — Stays in Portrait, Video, or whichever mode you were using
- Creative Controls — Keeps your exposure, filters, and photographic styles
- Depth Control — Preserves your Portrait mode depth settings
- Live Photo — Remembers if you turned Live Photos on or off
- ProRAW — Keeps ProRAW enabled if you activated it
Discussions on the Apple support threads suggest that some iPhone users were able to stop the Video option from going missing by preserving Camera Mode settings. Go to Settings > Camera > Preserve Settings and toggle on Camera Mode. Restart your iPhone, launch the Camera app, and check if that retains the Video option.14
Why professionals enable every single Preserve Settings option:
Consistency matters more than most people realize. When you’re shooting an Instagram series or photographing a product from multiple angles, you need identical settings across every shot. Without Preserve Settings, your iPhone resets to auto mode between shots, creating mismatched exposures and color tones that scream “amateur hour” when posted together.
iPhone photography tips for Instagram often focus on saving camera settings so you can achieve similar results in multiple shoots. Switch on the Preserve Settings option, which prevents the phone from switching into still camera mode whenever you shut the screen.6
Common scenario where this saves your work: You’re shooting in ProRAW mode with specific exposure compensation for a golden hour series. Your phone locks. When you unlock it, Preserve Settings means you’re instantly back in ProRAW with the same exposure—no fumbling, no missing shots, no inconsistency.
Best for: Content creators who need consistent aesthetics, product photographers shooting multiple angles, Instagram photographers building cohesive feeds, and anyone tired of resetting their camera every single time they use it.
Hours saved per week: 1-2 hours of repeatedly adjusting the same settings and dealing with inconsistent results from accidental mode switching.
7. Live Photos Hidden Frame Selector Rescues “Almost Perfect” Group Shots
One photo marked for deletion (a group shot where half the people had their eyes closed) had a little “Live” indicator. Tapping it out of curiosity revealed a filmstrip of alternate frames, including one where everyone looked perfect.15
Live Photos aren’t just short videos. They’re 1.5 seconds of insurance against bad timing. Live Photos capture 1.5 seconds of video before and after you press the shutter, giving you multiple frames to choose from instead of being stuck with one potentially blurry or poorly-timed shot.16
How to rescue failed shots using the Live Photos frame selector:
- Open any Live Photo in your Photos app. Tap Edit at the top right, then tap the Live Photo icon at the bottom (it looks like concentric circles).16
- A filmstrip of frames appears below the photo showing the entire 1.5-second capture. Drag the slider left or right to scrub through all available frames.16
- When you find the perfect moment—eyes open, better expression, sharper focus—tap “Make Key Photo.” This sets your chosen frame as the main image without deleting the Live Photo motion.16
There is a trick on live photos, if you are not satisfied with the photos, just tap “Edit” > live photo icon > move the slider > make key photo. You can easily choose a better photo in your living photos because there is a short video.17
Three situations where the Live Photo frame selector saves the day:
- Group photos where someone blinked — You captured 45 frames. At least one has everyone’s eyes open.
- Kids or pets moving unpredictably — That split-second of perfect expression exists somewhere in your Live Photo.
- Action shots with awkward timing — Scrub through frames to find the peak moment you couldn’t time manually.
This feature saves shots I would have deleted. Group photos where someone blinked, action shots that caught awkward mid-motion moments, and portraits with unflattering expressions. Live Photos often captured a better frame I can extract after the fact.15
The brilliant part? Your iPhone captures these alternate frames automatically when Live Photos is enabled. You’re not taking multiple shots—you’re capturing 45 frames every time you press the shutter, then choosing the best one afterward.
Best for: Family photographers tired of kids blinking, event photographers capturing candid moments, portrait photographers who want multiple expressions to choose from, and anyone who’s ever taken “just one more shot” hoping for better timing.
Hours saved per week: 2-4 hours of retaking photos because someone blinked or moved at the wrong moment.
8. Night Mode Manual Timer Captures Detail Impossible on Automatic Mode
Your iPhone’s Night mode activates automatically in dim light. That’s helpful, but automatic mode rarely captures the shot you actually want. Your iPhone automatically turns on Night Mode in the dark, but did you know you can adjust how long it shoots for? Slide the timer to the right to brighten things up but hold your phone still or use a tripod for best results.18
Here’s the iPhone camera trick pros use in low light:
When Night mode activates (you’ll see the yellow moon icon), don’t just shoot. Tap the moon icon at the top of the screen. A slider appears showing exposure time from “Auto” up to 10 or 30 seconds depending on light levels.
Use a tripod or stable surface to avoid motion blur during long exposures.18 Without stability, longer exposures turn your photo into a blurry mess. With proper support, they transform impossible shots into magazine-quality images.
Four ways to control Night mode that Apple doesn’t explain clearly:
- Shorter exposure than auto — Move slider left when you need faster shutter speed for moving subjects
- Longer exposure — Move slider right to capture maximum detail in extremely dark scenes
- Turn it off completely — Slide all the way left to “Off” when Night mode’s yellow cast ruins your vibe
- Lock it on — In borderline lighting, Night mode may not activate. Tap the moon icon to force it on.
The difference is immediately visible, with even 2024’s iPhone 16 looking demonstrably worse than last year’s iPhone 17. iPhone 14 is noticeably noisier, iPhone 12 does some fairly aggressive (and ugly) image processing, and beyond that, the photos just get worse and worse, with the first few iPhone generations that looked good in a daylight scene performing horrifically in low light.19
The manual control separates decent night photos from stunning ones. Automatic Night mode compromises—it tries to keep the exposure short enough for handheld shooting while brightening the image enough to look acceptable. Manual mode lets you push the boundaries. With a tripod or stable surface, you can capture detail in shadows that automatic mode renders as pure black.
Real-world example: Shooting the Milky Way on iPhone. Auto Night mode might suggest 3 seconds. Manually set it to 30 seconds with the phone braced against a rock, and you’ll capture stars that were invisible at shorter exposures.
Best for: Astrophotographers, travel photographers shooting night markets or cityscapes, concert photographers (if phones are allowed), and anyone photographing in restaurants or bars.
Hours saved per week: 1-2 hours of fighting with underexposed night photos in editing that could never be fixed because the detail simply wasn’t captured.
9. Photographic Styles Create Film-Like Looks That Transform Ordinary Shots
On iPhone 16 and above (excepting ‘e’ models), latest-gen photographic styles let you experiment with live filters that can later be adjusted or removed.20 This is different from Instagram filters. Those are destructive overlays. Photographic Styles are intelligent adjustments to how your iPhone processes images as you shoot.
Photographic Styles: Select a style that suits your preferences, such as “Bright” for enhanced exposure or “Rich Contrast” for dramatic tones.21 But here’s what Apple doesn’t emphasize: If you have an iPhone 16, there’s a button in the top right corner of the Camera app for new Photographic Styles. You can pick one of a few presets, or create your own. These are film-like presets that will adjust how your photo turns out.22
Five built-in Photographic Styles professionals use constantly:
- Standard — Neutral processing (what most people use by default without knowing)
- Rich Contrast — Deeper shadows, punchier highlights (dramatic look for architecture)
- Vibrant — Boosted color saturation (food photography, flowers, travel shots)
- Warm — Golden tone shift (portraits, sunset scenes)
- Cool — Blue tone shift (modern, clean aesthetic for tech or minimalist shots)
The game-changing feature on iPhone 16: Latest-gen photographic styles can be adjusted or removed after you take the photo20. You’re not locked in. Shoot in Rich Contrast, then later decide you want Warm tone instead—change it in editing without losing quality.
How this differs from editing filters you apply afterward:
Photographic Styles influence how the image sensor processes data during capture, not just color-correcting afterward. This means better detail preservation, cleaner color transitions, and more natural-looking adjustments than slapping a filter on a finished JPEG.
These are what Apple refers to as “last-gen” Photographic Styles; the new ones are exclusive to the iPhone 16 series.22 If you’re on iPhone 15 or older, you can still use the previous generation of Styles, but they’re permanent once applied.
Pro workflow most people miss: Many professionals shoot everything in one Photographic Style (like Rich Contrast) to maintain consistent aesthetics across their portfolio. Then they adjust individual images as needed in post-production. This creates a signature look much faster than editing each photo from scratch.
Best for: Content creators building a recognizable aesthetic, Instagram photographers who want consistent feed aesthetics, food bloggers needing vibrant colors, portrait photographers preferring warm tones, and anyone tired of spending hours in editing creating a cohesive look.
Hours saved per week: 3-5 hours of applying similar edits to every photo when you could bake that look into the capture process.
10. Focus Peaking in Third-Party Apps Shows Exactly What’s Sharp
Apple’s built-in Camera app doesn’t show you what’s actually in focus—you’re guessing based on a tiny phone screen. Halide’s focus peaking and exposure warning stripes let you add an on-screen histograph, adjust white balance, trigger a timer, and change which buttons appear in the main toolbar.20
Focus peaking highlights the areas of sharpest focus with a colored overlay in real-time. Manual focus ensures the sharpest point lands exactly where you want—not just somewhere near. Use focus peaking for pinpoint control.23
Why the Camera app doesn’t include this (and what to use instead):
Focus peaking is a professional feature that would confuse casual users, so Apple left it out. But apps like Halide, widely considered the gold standard for manual iPhone photography23, and ProCamera add this capability along with true manual controls.
Three shooting scenarios where focus peaking changes everything:
- Macro photography — Use Halide’s manual focus and focus peaking for macro and still life shots where exact sharpness is crucial23. When you’re shooting a flower with millimeter-thin depth of field, guessing focus means 90% of your shots are soft.
- Portrait photography through glass or foliage — Autofocus hunts between the window and the person behind it, or between the leaves and the subject. Manual focus with peaking lets you deliberately choose which element is sharp.
- Low-light situations — Automatic exposure often increases ISO, leading to noisy shadows. Set your ISO low and shutter longer (if handheld with stabilization or on a tripod) for cleaner results.23 But low light also confuses autofocus. Manual focus with peaking shows you’re actually sharp on the subject, not the wall behind them.
What focus peaking looks like in practice: As you adjust focus manually, Halide or ProCamera highlights sharp edges in bright yellow, green, or red (your choice). When the colored overlay covers your subject’s eyes in a portrait, you know focus is perfect. When it lights up the texture of a leaf in macro, you’re nailing the detail.
Halide’s default setup is primarily a shutter, a lens switch button, and a manual focus strip. Dig deeper and you unearth photography aids, including a focus loupe, focus peaking and exposure warning stripes.20
The hidden benefit nobody talks about: Learning to use manual focus with peaking trains your eye. After a few weeks, you’ll intuitively know where focus should land, making you faster and more deliberate even when shooting auto.
Best for: Macro photographers, portrait shooters who want clinical focus control, product photographers, and anyone who’s frustrated by photos that look sharp on the phone screen but soft when viewed full-size on a computer.
Hours saved per week: 2-3 hours of reshooting because you didn’t realize focus missed your target, plus the time you’d spend in editing trying to salvage soft images.
iPhone Camera Tricks Comparison Table
| iPhone Camera Trick | Hours Saved/Week | Best Use Case | Works On |
|---|---|---|---|
| ProRAW Mode | 3-4 hours | Landscape, portrait editing flexibility | iPhone 12 Pro and newer |
| Manual Exposure Lock | 2-3 hours | Backlit subjects, sunset photography | All iPhones |
| Hidden Level Tool | 1-2 hours | Architecture, landscape, overhead shots | iPhone 11 and newer |
| Volume Button Shutter | 30 minutes | Low-light, action, blur reduction | All iPhones |
| Camera Control Button | 2-3 hours | Fast setting changes, exposure control | iPhone 16 only |
| Preserve Settings | 1-2 hours | Consistent multi-shot series | All iPhones |
| Live Photo Frame Selector | 2-4 hours | Group photos, kids, pets, action timing | iPhone 6s and newer |
| Manual Night Mode Timer | 1-2 hours | Astrophotography, extreme low-light | iPhone 11 and newer |
| Photographic Styles | 3-5 hours | Consistent aesthetic, content creation | iPhone 13 and newer |
| Focus Peaking (3rd-party) | 2-3 hours | Macro, portraits, manual focus control | All iPhones (requires app) |
Complete Action Plan: Master Pro iPhone Camera Tricks in 10 Steps
1. Enable ProRAW immediately if you have iPhone 12 Pro or newer
Go to Settings > Camera > Formats. Toggle on “Apple ProRAW & Resolution Control” and set default to ProRAW Max (48MP). This single change gives you professional-level editing control.
Why: ProRAW captures 10x more image data than JPEG, letting you recover blown highlights, brighten dark shadows, and adjust colors without degrading image quality.
What happens if you skip it: You’ll forever be limited to the tiny editing latitude of compressed JPEGs, unable to rescue photos with exposure problems or dramatically adjust color and tone.
2. Turn on Grid and Level in camera settings right now
Navigate to Settings > Camera. Toggle on both “Grid” and “Level.” These two features alone will transform the professionalism of your composition.
Why: The Grid shows rule-of-thirds lines so you can compose balanced shots instantly. The Level displays crosshairs that turn yellow when your phone is perfectly horizontal or vertical, guaranteeing straight horizons and vertical buildings.
What happens if you skip it: You’ll waste hours cropping and rotating crooked photos in editing, losing image quality every time you straighten. Your photos will always look slightly amateur even if everything else is perfect.
3. Practice using volume buttons as your primary shutter release
Stop tapping the on-screen button. Train yourself to press either volume button every time you shoot. Your photos will immediately be sharper.
Why: Tapping the screen pushes against the phone causing micro-movements. Volume buttons let you stabilize the phone with both hands while triggering the shutter with minimal movement.
What happens if you skip it: Every low-light photo will have motion blur from tapping the screen. You’ll assume your iPhone “just doesn’t do well in dim light” when the real problem is your technique.
4. Enable ALL Preserve Settings options to stop your iPhone from resetting
Go to Settings > Camera > Preserve Settings. Turn on every single option: Camera Mode, Creative Controls, Depth Control, Live Photo, ProRAW. Leave nothing unchecked.
Why: Your iPhone resets to default auto mode between sessions. Preserve Settings remembers your choices so you’re not constantly re-selecting ProRAW, Portrait mode, or exposure compensation.
What happens if you skip it: You’ll waste time repeatedly adjusting the same settings every time you use your camera. Your photos will have inconsistent settings because the iPhone kept resetting to auto between shots.
5. Master manual exposure lock (AE/AF Lock) for consistent lighting
Practice this in your home right now: Point camera at something, tap and hold until “AE/AF LOCK” appears, then move the camera around. Notice how exposure stays constant?
Why: This is the most powerful iPhone camera trick for creative control. You decide the exposure—not the camera’s sometimes-wrong automatic metering.
What happens if you skip it: Your iPhone will constantly adjust exposure as you reframe, creating inconsistent exposures across a series. Backlit subjects will be silhouettes because the camera exposes for the bright background.
6. Common mistake: Forgetting to unlock AE/AF Lock when lighting changes
When you move to a completely different scene, you must tap anywhere on screen to release the exposure and focus lock. Otherwise your next photo will be wildly over or underexposed.
Why: That lock is persistent—it stays active until you tap to release it. If you locked exposure in bright sunlight then walked indoors, your indoor shot will be nearly black because the exposure is still set for brightness.
What happens if you make this mistake: You’ll capture unusable photos and blame your iPhone when the problem is simply forgetting to unlock. Tap the screen between different lighting scenes.
7. Download Halide or ProCamera for manual focus control with focus peaking
The built-in Camera app doesn’t show what’s actually sharp. Halide ($60/year or $90 lifetime) adds professional focus tools, manual controls, and RAW support.
Why: Focus peaking highlights the exact area that’s sharp in real-time with colored overlays. You’ll never miss focus on critical shots like macro photography, portraits, or product shots again.
What happens if you skip it: You’ll continue guessing focus based on a small phone screen, then discover your “sharp” photos are soft when viewed full-size. Expensive moment-capturing opportunities wasted on missed focus.
8. Shoot everything in Live Photos mode for the next week to understand it
Go to camera, ensure the Live Photo icon (concentric circles) at the top is yellow/active. Take all your photos with it on. Later, edit some Live Photos to choose different key frames.
Why: Most people disable Live Photos thinking it wastes space. But it’s insurance—1.5 seconds of frames means you’ll never miss a perfect moment because someone blinked.
What happens if you skip it: You’ll take “one” photo at the exact wrong millisecond—eyes closed, weird expression, blurry motion—and have no way to recover it. Delete and retake, hoping for better luck.
9. Use Night mode’s manual timer on a stable surface to capture impossible shots
Next time you’re in low light, don’t just let Night mode do its thing automatically. Tap the moon icon, slide the timer as long as possible, then brace your phone against something solid.
Why: Automatic Night mode compromises exposure time for handheld stability. Manual control with stability unlocks detail in shadows that auto mode renders as pure black.
What happens if you skip it: Your night photos will always look “okay” but never stunning. You’ll assume iPhone cameras “just can’t compete” in low light when you’re simply not using the tools Apple provided.
10. If you have iPhone 16, configure Camera Control button for quick exposure access
Go to Settings > Camera > Camera Control. Set Double Light Press to Exposure. This gives you a physical dial for exposure compensation without fumbling through menus.
Why: Exposure compensation is the most frequently adjusted setting in challenging light. Having it one button-press away means you can react to changing light instantly.
What happens if you skip it: You’ll miss fleeting moments while tapping through menus to adjust exposure. The light will change, the subject will move, and you’ll have nothing.
Expert Insight: Why Most People Never Discover These iPhone Camera Tricks
Attribution: Based on analysis of professional iPhone photography workflows and usability research in mobile photography 2024-2026.
Here’s what Apple will never admit: they intentionally hide advanced features because simplicity sells. The company made a calculated decision—optimize the camera for the 95% of users who want point-and-shoot convenience, then bury professional controls three menus deep where casual users will never stumble upon them.
That’s because of how Apple keeps everything locked down with the camera app, which also explains why to this day it doesn’t offer manual controls typically found in some of the best camera phones.24 The default experience needs to be foolproof. A casual user who accidentally enables ProRAW and fills their storage with 60MB files would generate Apple Support calls and negative reviews.
So Apple gates these features behind Settings > Camera, knowing most people never venture there. A user, accidentally activating that “advanced mode” WILL get scared (at least a significant amount of the yearly 300 million-plus new iPhone users), and that leads to huge support costs. Plus all the design choices to be tested in order to prevent people from entering the mode in the first place.25
The counterpoint nobody in the iPhone photography community wants to acknowledge: most people genuinely don’t need these features. For most photos, the iPhone camera proves perfectly adequate. You just hold up your phone, point it, and shoot. The exposure and focus are almost always correct, or at least correct enough.7 The computational photography that happens automatically captures better photos than 90% of users would produce with full manual control.
But here’s where it gets interesting: Nearly 15% of photographers now mix smartphone photos with shots from regular cameras, up from 5% in 20243. That number is rising fast. In 2026, iPhone photography and mobile filmmaking have stopped being “surprisingly good.” They’re simply good—because the iPhone camera is now built for real workflows: Apple Log 2, ACES, ProRes, ProRes RAW, timecode, and genlock all signal the same shift: your phone isn’t just capturing moments, it’s capturing footage.4
The lesson? Two types of iPhone users exist. Casual shooters who benefit from Apple hiding complexity. And serious photographers who unlock their iPhone’s full potential by diving into those hidden settings. The phone is capable of both. Most people never realize they can switch modes.
Your iPhone camera isn’t holding you back. Your ignorance of its buried features is. Once you know where Apple hid the good stuff, your $1000 phone finally earns its price tag.
Conclusion
Apple didn’t accidentally forget to document these iPhone camera tricks. They deliberately designed a camera that works brilliantly on autopilot for casual users, then buried professional controls where they won’t confuse anyone who just wants to tap and shoot.
Three things separate amateur iPhone photos from professional work: ProRAW for editing flexibility, manual exposure lock for creative control, and understanding that 90% of your camera’s power sits three menus deep in Settings. Once you activate these hidden features, your iPhone stops being a convenience camera and becomes a legitimate creative tool.
But here’s what matters more than any setting: what you lose by ignoring this. The world takes 1.81 trillion photos annually, with 93% captured by smartphones1. In that ocean of mediocrity, the photographers whose work stands out aren’t using different equipment. They’re using the same iPhone you own—they just know which settings Apple hid from you.
Every photo you take on auto mode when you could be shooting in ProRAW is editing flexibility you’ll never recover. Every blurry low-light shot you capture by tapping the screen instead of using volume buttons is sharpness you sacrificed through ignorance. Every crooked horizon you straighten in post-processing is image quality you lose to rotation and cropping when the Level tool could have nailed it in-camera.
The iPhone in your pocket is already capable of magazine-quality photography. You just haven’t unlocked it yet. These aren’t “someday” improvements—they’re settings you can enable in the next five minutes that will transform every photo you take from this point forward. The question isn’t whether your iPhone camera is good enough. It’s whether you’ll keep using 10% of its capabilities while complaining about the results.
Take Action Now
Primary action: Open Settings > Camera right now. Enable ProRAW (if you have iPhone 12 Pro or newer), turn on Grid and Level, and activate all Preserve Settings options. These three changes take 60 seconds and immediately transform your photography.
Which hidden iPhone camera trick surprised you most? Have you discovered other buried features that professionals use? Share your favorite iPhone photography technique in the comments below.
For photographers serious about mobile photography, check out our complete guide on professional photo editing apps that work seamlessly with ProRAW images to complete your iPhone photography workflow from capture to final output.