Disclaimer: This article is for educational and informational purposes only. Enabling developer mode and modifying developer settings can affect your device’s performance, security, and warranty. Always proceed with caution, back up your data, and consult your device manufacturer’s documentation before making changes. The author and publisher are not responsible for any damage, data loss, or security issues resulting from actions taken based on this content.
Hidden Developer Mode Secrets Your Phone Never Told You
You’ve had a supercomputer in your pocket for years. Turns out, you’ve only been using half of it.
Most people tap through their phone settings maybe twice a year. You’re about to realize there’s an entire hidden layer sitting right underneath your nose, and once you see what’s in there, you won’t be able to unsee it.
Introduction: The Settings Menu Nobody Talks About
Every Android phone ships with a locked menu called Developer Options. It’s hidden by default, not because it’s dangerous (mostly), but because the average person was never supposed to need it. It was built for engineers, app testers, and developers who needed fine-grained control over how their device behaves.
But here’s the thing: a lot of what’s in that menu is genuinely useful for regular people too. We’re talking faster animations, better battery management, ways to test apps before release, tools to clone your phone wirelessly, and features that make your device behave in ways the manufacturer never advertised.
The reason you’ve never heard about most of this? Nobody bothered to explain it in plain English. Tech journalists write about it for other tech journalists. Developer documentation reads like instruction manuals from 1994. And most “phone tips” articles online recycle the same five tricks you already know.
This one is different. We’re going through developer mode feature by feature, explaining what each one actually does, who benefits from it, and what you can realistically do with it today. No coding required. No computer science degree needed. Just a phone, a few taps, and the willingness to poke around somewhere most people never go.

How to Actually Unlock Developer Mode on Your Phone
Before any of the good stuff, you need to unlock developer mode. The process is the same across almost all Android devices, with minor variations depending on the manufacturer.
Here’s how you do it:
- Open Settings
- Scroll down to About Phone
- Find Build Number (sometimes under “Software Information”)
- Tap Build Number seven times in a row
- You’ll see a message that says “You are now a developer”
- Go back to Settings, and you’ll find Developer Options in the main menu or under System
That’s it. Seven taps on a number you’ve never paid attention to. Samsung devices sometimes require you to enter your PIN before it activates. Some Xiaomi and OnePlus phones have it buried slightly differently, but the Build Number tap method works universally across Android.
iPhone users: iOS doesn’t have a developer mode in the same sense. Apple offers a Developer Mode toggle for testing apps, but it requires a paid Apple Developer account. Most of what we cover here is Android-specific. A brief iPhone section appears later in this post.
Once you’re in, you’ll see a long list of toggles and settings. It can look overwhelming. That’s why we’ve broken it down into the features that matter most, what they do, and who they’re for.
Developer Mode and the Animation Speed Trick That Changes Everything
Let’s start with the one that feels most immediately satisfying. Inside Developer Options, you’ll find three settings:
- Window animation scale
- Transition animation scale
- Animator duration scale
All three are set to 1x by default. Change them all to 0.5x and your phone will feel like you just bought a new one. Every app, every swipe, every transition snaps open twice as fast.
This isn’t a placebo effect. These settings control how long your phone takes to play the visual transitions between screens. At 0.5x, animations complete in half the time. The phone isn’t actually faster under the hood, but it feels dramatically more responsive because you spend less time watching things animate and more time actually using them.
You can also set them to OFF entirely, which removes animations altogether. Some people love this. Others find it disorienting because there’s no visual feedback that an app actually opened. Start with 0.5x and see how it feels.
Who benefits most:
- Anyone on an older Android device that feels sluggish
- People who find the default animations too slow or theatrical
- Anyone who wants their phone to feel snappier without spending money on an upgrade
Estimated time saved: This doesn’t save hours in a spreadsheet sense, but if you unlock your phone 80 times a day (the average, according to multiple usage studies), you’re removing 80 small moments of waiting. That compounds into something that genuinely changes how your phone feels to use.
USB Debugging: The Developer Mode Feature That Powers a Whole Ecosystem
USB Debugging sounds technical and vaguely alarming. It’s not. What it does is allow your phone to communicate with a computer at a deeper level than normal file transfer.
With USB Debugging on, you can:
- Mirror your phone screen to your computer using free tools like scrcpy
- Control your phone from your computer keyboard and mouse
- Run automated tasks on your phone from a desktop terminal
- Install apps that aren’t on the Play Store (called sideloading)
- Capture detailed logs if an app keeps crashing, so you can report the actual bug
For most regular users, the most exciting use case here is screen mirroring and control. scrcpy (pronounced “screen copy”) is a free, open-source tool that mirrors your phone to your desktop with almost zero latency. You can type on your phone using your real keyboard. You can answer WhatsApp messages without picking up your device. You can record your screen for tutorials or presentations.
This is one of those things that feels absurd the first time you use it. You’re sitting at your desk, typing a message on your computer, and it’s going to someone’s phone. It sounds like it should cost money and require some complicated setup. It takes about ten minutes and it’s completely free.
Security note: Only enable USB Debugging when you actually need it. With it on, any computer you connect to with a USB cable could potentially access your device. Turn it off when you’re done. The convenience is real, but so is the risk if you plug into a public charging station with it enabled.
Wireless Debugging: The Hidden Developer Mode Feature for Cord-Free Control
Wireless Debugging is USB Debugging’s newer, more convenient cousin. Available on Android 11 and above, it lets you connect your phone to your computer over Wi-Fi instead of a USB cable.
Once you pair the devices once, you can control and interact with your phone from across the room. No cable. No port required.
The practical use cases here overlap with USB Debugging but add the freedom of not being tethered. If you’re a content creator recording yourself and you want to start or stop a screen recording from your laptop, this is how you do it. If you’re a developer (or just someone who likes to tinker), you can push files and run commands on your phone without ever touching it.
For regular users, the most useful application is wireless screen mirroring for presentations. Prop your phone up, connect wirelessly, and display what’s on your phone screen to a larger monitor or projector without a cable running across the room.
It’s also increasingly being used alongside AI automation tools that chain phone actions together. Apps like Automate, Tasker, and even some AI assistant integrations use ADB (Android Debug Bridge, the technology behind this feature) to trigger complex sequences of phone actions that aren’t possible through the normal settings.
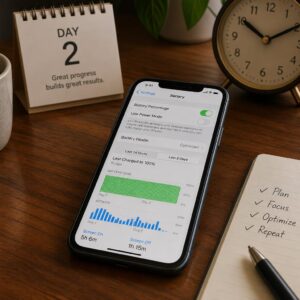
Background Process Limits: How Developer Mode Can Extend Your Battery Life
This one is a bit more nuanced, but the payoff is real. Inside Developer Options, there’s a setting called Background Process Limit.
Your phone constantly runs apps in the background. Even apps you closed an hour ago might still be running, using RAM, occasionally pinging servers, and draining your battery. The Background Process Limit setting lets you cap how many apps can run simultaneously in the background.
Options typically include:
- Standard limit (default, set by the system)
- No background processes
- 1, 2, 3, or 4 background processes
Setting this to 2 or 3 is the sweet spot for most people. Your most recently used apps stay ready to open instantly. Everything else gets completely suspended. You lose the convenience of picking up exactly where you left off in every app, but you gain noticeably better battery life and a phone that doesn’t slow down when you’ve been using it for a few hours.
The tradeoff is real. If you’re someone who constantly switches between 10 different apps, limiting background processes will be annoying because apps reload every time you switch to them. If you mostly use one or two apps at a time and then close them, you’ll barely notice and your battery will thank you.
According to research on mobile optimization from the World Economic Forum, background processes are among the top culprits behind unexpected battery drain. Managing them manually gives you back control the default OS settings never offer.
Mock Locations: Developer Mode’s Most Misunderstood Feature
Mock Locations lets you fake your GPS location. Your phone will report that you’re in Tokyo when you’re sitting in Toronto.
Yes, people use this for games like Pokemon Go. That’s the version of this story everyone already knows. But the legitimate use cases are more interesting and more useful.
App testing: If you’re building or testing an app that uses location data, you need to simulate being in different places without actually traveling. Mock Locations makes this possible.
Privacy protection: Some apps request location data for features that don’t need it. With a mock location active, you’re feeding those apps a fake position. Your real location stays private.
Accessing location-restricted content: Some services behave differently depending on where you are. Prices change. Menus change. Features appear or disappear. Mock Locations lets you see what other users in other places see.
Business use cases: A company running location-based marketing campaigns can test how their ads, notifications, or app features appear in different cities without sending employees there.
To use Mock Locations, you need a third-party mock GPS app (several free ones exist on the Play Store). Then, inside Developer Options, you set that app as your Mock Location App. From there, you pick your fake location in the app, and your phone believes it.
One important caveat: some apps, particularly banking and payment apps, have anti-spoofing measures that detect mock locations and will refuse to work or flag the account. Don’t use this for anything where location accuracy is required for security purposes.
Force GPU Rendering: Developer Mode’s Graphics Boost
Your phone has two types of processing power: CPU (the main brain) and GPU (the graphics chip). By default, many apps use the CPU for drawing their interface elements, even though the GPU is significantly better at that job.
Inside Developer Options, there’s a toggle called Force GPU Rendering (sometimes labeled “Force 4x MSAA” or similar). Turning this on forces apps to use the GPU for 2D rendering, which can make them smoother and more responsive, especially on older devices.
The practical effect varies by phone and by app. On newer flagship devices, you might not notice much difference because the hardware is already fast enough that the CPU handles UI rendering without breaking a sweat. On mid-range or older devices, this setting can meaningfully reduce the jerkiness you get when scrolling through a heavy app or switching between screens.
There’s a mild battery cost. The GPU uses more power than the CPU for this kind of work, so enabling this setting can shorten battery life slightly. Most people who notice an improvement in smoothness consider it a fair trade.
Best for:
- Older Android phones feeling sluggish with modern apps
- Anyone who notices stuttering when scrolling through social media feeds
- Gamers who want slightly smoother frame delivery in graphic-intensive apps
OEM Unlocking: The Developer Mode Setting That Opens the Deepest Doors
OEM Unlocking is the most powerful, most irreversible, and most carefully considered setting in Developer Options. It’s also the one most people either never encounter or hear about only in the context of rooting, which gives it a reputation that scares people off unnecessarily.
What it does, technically, is unlock the bootloader. The bootloader is the software that starts your phone up before the operating system loads. Normally it’s locked, meaning only the manufacturer’s approved operating system can run on the device.
Unlocking it allows you to:
- Install a custom operating system (called a custom ROM) if the stock Android from your manufacturer is full of bloatware you can’t remove
- Root your device, giving you administrator-level access to every file and function
- Remove pre-installed apps that can’t be uninstalled normally
- Install the full stock Android experience on a Samsung or Xiaomi device if you prefer it
What you need to know before touching this:
- Unlocking the bootloader wipes your device completely. Everything gone. Back up first.
- Some devices can’t be re-locked, meaning your phone permanently shows an “unlocked bootloader” warning on startup
- Certain apps (banking apps, payment apps, some streaming services) detect an unlocked bootloader and refuse to run for security reasons
- It voids your warranty in most cases
This is not a setting to flip casually. But if you’ve got a phone that’s been abandoned by manufacturer updates and you want to run a more current version of Android on it, OEM Unlocking is the first step, and for some older devices, it’s genuinely the difference between a useful device and a paperweight.
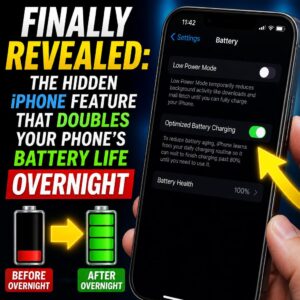
Keep Screen On While Charging: Developer Mode’s Most Overlooked Utility Feature
This one is simple, practical, and underappreciated. Inside Developer Options, there’s a toggle labeled Stay Awake or Keep Screen On While Charging.
With this on, your phone screen never goes to sleep while it’s plugged in.
It sounds minor. The use cases are surprisingly broad:
- Using your phone as a dashboard while driving (Google Maps, Waze, Spotify controls visible at all times)
- Desk clock or ambient display while charging overnight
- Recipe display while cooking without having to tap the screen every two minutes to keep it awake
- Presentation display where you need the screen visible continuously
- Monitoring apps where you want live data visible, like network speed monitors or battery charge percentage
If you’ve ever been irritated by your phone going to sleep in the middle of following a recipe or watching navigation instructions, this is the fix. It only works while charging, so you don’t accidentally drain your battery by leaving it on.
Show Touches and Pointer Locations: Developer Mode’s Screen Recording Secret
This is one developers use all the time, but content creators and educators have started adopting it heavily. The Show Taps and Pointer Location settings display visual indicators on screen whenever you touch the display.
Show Taps puts a small circle wherever your finger lands. Pointer Location adds a crosshair and coordinate readout that tracks your finger’s exact position in real time.
Why this matters for non-developers:
If you record tutorials, how-to videos, app demonstrations, or anything where viewers need to see what you’re tapping, these overlays make your recordings dramatically easier to follow. Instead of a viewer wondering “wait, what did they just tap?”, there’s a clear visual marker on screen.
It’s also useful for:
- Teaching someone else how to use an app remotely (they can see exactly where to tap)
- Debugging a touchscreen that seems to register taps in the wrong location
- Creating professional app demo videos without needing third-party software
A report on digital content creation trends from MIT Technology Review highlights how creators are increasingly turning to native device features rather than expensive software to produce polished educational content. Show Taps is a textbook example of that shift.
Running Services Monitor: See Exactly What’s Eating Your Phone’s RAM
Inside Developer Options, there’s a section called Running Services (sometimes under “Memory” on older Android versions). It shows you a live, real-time view of every process currently running on your phone, how much RAM each one is using, and how long it’s been running.
This is the mobile equivalent of opening Windows Task Manager or Activity Monitor on a Mac. You can see exactly which apps are running in the background right now, even the ones that don’t show up in your recent apps tray.
What you’ll often find is surprising. Apps you haven’t opened in days quietly running in the background. System processes you don’t recognize consuming chunks of RAM. Services started by apps you’ve barely used sitting there, persistent, eating memory.
You can tap any running service to see more details, and in some cases, stop it from running. This is more granular control than the standard “Force Stop” option in normal app settings.
Practical use cases:
- Diagnosing why your phone is running hot when you’re not doing anything with it
- Identifying battery-draining background apps that the standard battery settings miss
- Understanding which apps are the worst offenders for always-on background activity
This won’t turn an old phone into a new one, but it’ll help you make informed decisions about which apps to uninstall or restrict, based on actual data rather than guesswork.
Comparison Table: Default Phone Settings vs. Developer Mode Unlocked
| Feature | Default Phone Settings | With Developer Mode Enabled |
|---|---|---|
| Animation Speed | Fixed at 1x, manufacturer default | Adjustable to 0.5x or OFF for instant snappiness |
| Background App Control | System-managed, limited user control | Manual cap: 1, 2, 3, or 4 background processes |
| Screen Mirroring | Requires paid apps or hardware dongles | Free via USB/Wireless Debugging + scrcpy |
| GPS Location Control | Fixed to actual GPS location | Full mock location control via third-party apps |
| GPU Usage for UI | CPU handles most UI rendering by default | Force all apps to use GPU for smoother visuals |
| RAM Monitoring | Basic battery/storage stats only | Live running services view with per-app RAM data |
| Screen Record Touches | No built-in tap indicators | Show Taps overlay for professional tutorial recording |
| Bootloader Access | Locked, manufacturer OS only | OEM Unlock allows custom OS and root access |
| Screen Sleep Behavior | Sleeps after set timeout, always | Stays awake indefinitely while charging |
| App Installation | Play Store only (with standard settings) | Sideload any APK from any source |
Sideloading Apps: What Developer Mode Enables Beyond the Play Store
Sideloading means installing an app from outside the official Play Store. To do it, you need USB Debugging enabled or the “Install Unknown Apps” permission toggled on (which lives in standard Settings but works in tandem with developer features).
The use cases for sideloading are more mainstream than they used to be:
- Apps banned in your region that are available elsewhere (some VoIP apps, streaming services, utilities)
- Older versions of apps when a recent update broke something you relied on
- Apps pulled from the Play Store for policy reasons that still work perfectly fine
- Open-source apps that developers distribute directly without going through Google’s process
- Beta versions of apps not yet in the public Play Store
Amazon’s own App Store is technically a sideloaded app. F-Droid, a repository of entirely open-source Android apps with no trackers or ads, requires sideloading to install. If you want a version of your favorite app that doesn’t include the default ad tracking, chances are someone has published a privacy-focused fork that you can only get by sideloading.
What to watch out for: Sideloading from random websites is genuinely risky. Malicious APKs are a real thing. Stick to sources you trust: the developer’s official website, GitHub repositories, F-Droid, or the Amazon App Store. Never sideload an app that promises premium features for free.
The Networking Tools Hidden Inside Developer Mode
Developer Options contains several networking-related settings that don’t get nearly enough attention.
Bluetooth Audio Codec Selection is one of the best. By default, your phone negotiates a Bluetooth audio codec with your headphones automatically, but it often settles on a lower-quality codec even when your headphones support better ones. Inside Developer Options, you can manually force a specific codec:
- SBC: The baseline, lowest quality
- AAC: Better quality, default for most iPhones and compatible headphones
- aptX / aptX HD: Higher quality for compatible headphones
- LDAC: Sony’s high-resolution audio codec, significantly better quality when both the phone and headphones support it
If you have quality Bluetooth headphones and you’re not getting the audio quality they’re capable of, forcing the right codec in Developer Options can be a meaningful upgrade with zero cost.
Wi-Fi Settings in Developer Options let you enable verbose Wi-Fi logging, which shows you much more detail about which networks your phone is connected to and why it might be dropping or switching networks unexpectedly. If you’ve ever been frustrated by your phone stubbornly holding onto a weak Wi-Fi signal instead of switching to a stronger one nearby, the verbose logging helps you pinpoint exactly when and why that’s happening.
Mobile Data Settings include options for forcing your phone to a specific network generation (3G, 4G, 5G) when the automatic switching is causing issues. In some areas, a phone constantly toggling between 5G and 4G causes more connection instability than just locking it to 4G. Developer Options gives you that control.
Developer Mode and AI-Powered Productivity: The Emerging Connection
Here’s where things get interesting for anyone using their phone for serious work. The same ADB (Android Debug Bridge) interface that powers USB and Wireless Debugging is increasingly being used by AI automation tools to control phones programmatically.
Tools like Tasker (a long-standing Android automation app) now integrate with AI services to create phone workflows that would be impossible without developer mode features. You can build automations that:
- Automatically open and respond to messages using AI-generated text when you’re driving
- Trigger specific app sequences based on your location, time, or other sensors
- Extract data from apps that don’t have an API and feed it to an AI model for analysis
- Control other devices on your network through your phone using ADB commands
Newer AI assistant integrations are also starting to use ADB-level access to perform tasks on your phone that normal voice assistants can’t touch. Think less “set a timer” and more “go into my banking app, find the last three transactions over $100, and summarize them for me.”
This is still emerging territory, but the foundation is already there. Developer mode is the gateway. The AI automation layer is being built on top of it right now.
What iPhone Users Get (and Don’t Get) From Developer Mode
Fair warning: if you’re an iPhone user, most of what’s in this article doesn’t apply to you directly. Apple’s iOS is significantly more locked down than Android, by design.
iOS does have a Developer Mode starting from iOS 16, but it’s purpose-built for app testing and requires a paid Apple Developer account to be useful. You won’t find animation speed controls, background process limits, or mock locations in there.
What iPhone users can do:
- Screen Time settings offer some overlap with background process management
- Guided Access (not developer mode, but a hidden feature) locks your phone to a single app, useful for kiosk or presentation use
- Third-party automation apps like Shortcuts offer some of the task automation developer mode enables on Android
- AirPlay and screen mirroring exist natively without developer unlocking
The honest truth is that Android offers meaningfully more control at the OS level, and developer mode is the clearest expression of that. If fine-grained phone control is something you value, it’s a legitimate reason to prefer Android.
Common Mistakes People Make in Developer Mode
Since developer options were built for engineers, the settings have almost no guardrails. That means there are a few mistakes worth explicitly warning against.
Leaving USB Debugging on permanently. This is the most common one. USB Debugging is useful when you need it and a security hole when you don’t. Make it a habit: turn it on for a task, turn it off when you’re done.
Setting background processes to zero. Zero background processes means every app restarts from scratch every single time you open it. This can feel like your phone is broken. Always leave at least 1 or 2 background processes allowed.
Enabling Logger Buffer Sizes and forgetting about it. Some developer settings create log files that eat storage silently. If you enable verbose logging to diagnose something, turn it off when you’re done or your internal storage will fill up faster than you expect.
OEM unlocking without a full backup. The bootloader unlock wipe is immediate and complete. There is no undo. If you go down that road, back up everything first. Twice.
Forcing GPU rendering on a low-end device. On very low-end phones, forcing GPU rendering can actually make things worse. If you enable it and your phone starts stuttering more, turn it back off.
The rule of thumb: change one setting at a time, observe the results, and know which toggle you flipped so you can reverse it if something feels off.
How to Use Developer Mode Safely: A Practical Checklist
You don’t need to be an engineer to use developer mode responsibly. You just need to be deliberate about it.
Before you start:
- Back up your data (Settings > Backup, or use Google One / a cloud service)
- Note which settings you change so you can reverse them
- Read what a setting does before toggling it
Settings that are safe for most users:
- Animation scale adjustments (always reversible)
- Stay Awake / Keep Screen On while charging
- Show Taps (toggle on and off freely)
- Background Process Limit (test at 2 or 3 first)
- Bluetooth codec selection (worst case, your audio sounds worse and you change it back)
Settings that need more caution:
- USB Debugging (enable only when actively using it)
- Mock Locations (disable when not in use, avoid in banking apps)
- Force GPU Rendering (monitor battery and performance after enabling)
Settings that require serious research first:
- OEM Unlocking (read extensively before touching this)
- ADB commands via terminal (if you get into running manual ADB commands, know what each one does before executing)
Developer mode is a power tool. Power tools are genuinely useful when you know what you’re doing and can cause real damage when you don’t. The settings above are not theoretical. They affect how your phone functions at a fundamental level.
Conclusion: The Phone You Already Own Is More Capable Than You Think
You’ve been carrying a device with an entire hidden control panel in your pocket, and until now, the door was locked because nobody handed you the key.
Seven taps on a build number. That’s all it takes to access animation controls that make your phone feel like an upgrade, networking tools that give you audio quality you’re actually paying for with those expensive headphones, background controls that extend your battery without buying a new phone, and a screen mirroring setup that costs absolutely nothing.
Developer mode isn’t for developers anymore. It’s for anyone who’s frustrated with the factory version of their phone and wants more control than the default settings offer.
The features in this article aren’t hacks or exploits. They’re legitimate tools that ship with every Android device, sitting behind a door that’s unlocked with nothing more than persistence and curiosity. The only thing that kept you from them before today was not knowing they existed.
Now you know.
CTA
Found a developer mode feature that changed how you use your phone? Drop it in the comments. Someone reading this right now has never heard of it.
Share this with someone who keeps complaining their phone is slow. It might just save them a trip to the phone store.