7 Secret iPhone Camera Tricks Professional Photographers Use That Make Any Photo Look Stunning
You’ve been walking around with a professional-grade camera in your pocket this whole time, and nobody told you how to use half of it.
That’s not an exaggeration. The iPhone camera has features that rival dedicated mirrorless cameras costing thousands of dollars, but most people tap the shutter button, hope for the best, and wonder why their photos look flat. Meanwhile, professional photographers are pulling jaw-dropping images from the exact same device. The difference is not the hardware. It is knowing where to look.
This post reveals 7 hidden iPhone camera tricks that pros use on every single shoot. Whether you’re capturing travel moments, portraits, food, or street scenes, these techniques will immediately change the way your photos look and feel.
“The quality of your images is not about the camera, it’s about the technique.” — Regan Baroni, professional food photographer
By the end of this post, you will know exactly how to unlock your iPhone’s full photographic potential, shoot images that stop people mid-scroll, and never waste a good moment on a bad photo again.
Why Most iPhone Photos Look Amateur (And How That Changes Today)
Here is the uncomfortable truth. Most people use roughly 10% of what their iPhone camera can actually do.
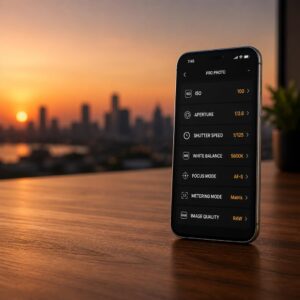
The native Camera app packs features borrowed directly from professional photography, including manual exposure control, optical zoom systems, RAW file capture, and cinematic depth-of-field effects. Apple has spent billions of dollars developing computational photography technology that processes every shot through machine learning algorithms before it even reaches your camera roll. And the majority of iPhone users tap once and swipe on.
According to a 2024 report from GSMA Intelligence, over 6.8 billion people worldwide now own smartphones, making mobile photography the most democratized art form in human history. The barrier to entry has never been lower. But that also means the bar for standing out has never been higher.
Professional photographers who shoot on iPhone are not using different hardware than you. They are using different habits. Small, repeatable techniques that most people skip because they do not know they exist.
Here are the 7 tricks that separate a stunning iPhone photo from a forgettable one.
Trick 1: The Exposure Lock That Changes Everything About Indoor Shots
Here is something most people do not realize: your iPhone sets exposure and focus together every time you tap the screen. That sounds helpful until the light shifts, someone walks past, or you need to reframe, and suddenly your beautifully exposed subject goes dark or blown out.
Professionals fix this with a simple move almost nobody knows about.
Press and hold your subject on the iPhone screen for two seconds. A yellow box locks around the focus point, and the words “AE/AF Lock” appear at the top of the frame. This stands for Auto Exposure / Auto Focus Lock. Once activated, your exposure stays locked no matter how you move the camera or how the scene changes around you.
This trick is a game-changer for:
- Indoor portraits near windows where light shifts constantly
- Restaurant and food photography under mixed artificial lighting
- Street photography where subjects move unpredictably
- Any scene where you want to frame creatively after locking focus
After locking, you can still slide the sun icon up or down to manually brighten or darken the image before you shoot. That gives you both the stability of a locked exposure and the control of manual adjustment. Combined, this creates consistently exposed photos that look like you spent three minutes setting up a DSLR.
Professionals use this on every single portrait session. Now you can too.
Trick 2: The Grid Setting Nobody Turns On (And Why It Instantly Improves Composition)
If your photos feel slightly off but you cannot identify why, this is almost certainly the fix.
Go to Settings, then Camera, then toggle Grid to on. A faint 3×3 grid now overlays your camera view at all times. This is the Rule of Thirds grid, one of the foundational principles of professional composition, built directly into your iPhone camera.
The Rule of Thirds divides your frame into nine equal sections using two vertical and two horizontal lines. The four points where those lines intersect are called power points. Placing your subject on one of those power points, rather than dead center, creates visual tension, balance, and interest that the human eye naturally finds satisfying.
Here is how professionals apply it:
- Portraits: Place the subject’s eyes on the upper horizontal line, not the center of the frame.
- Landscapes: Align the horizon with the bottom horizontal line to emphasize a dramatic sky.
- Architecture: Use the vertical lines to align buildings, doorways, or columns.
- Food photography: Position the hero element at an intersection point with props or textures filling the remaining space.
- Street scenes: Let subjects enter the frame from one side, placed on a vertical line with negative space ahead of them.
[INTERNAL LINK: rule of thirds explained for beginners]
The grid does not restrict your creativity. It gives you a scaffold to build from, and you will feel the difference in your composition instincts within a week of using it consistently.
Trick 3: The Golden Hour Timing Secret That Makes Every Scene Look Like a Movie Still
Professional photographers talk about golden hour the way chefs talk about quality ingredients. Use it right and almost anything looks extraordinary. Ignore it and you’re working against yourself.
Golden hour refers to the roughly 60-minute window just after sunrise and just before sunset. During this window, sunlight travels at a low angle through the atmosphere, scattering shorter blue wavelengths and letting longer red and orange wavelengths dominate. The result is soft, warm, directional light that wraps around subjects rather than beating down on them.
The same iPhone camera that produces flat, harsh photos at noon will produce images worthy of a magazine cover at 6:47 PM in October, given the same subject and scene.
Here is what to do with your iPhone during golden hour:
Face your subject toward the light. The warm, low-angle light should kiss your subject’s face at a slight angle, not come from directly behind them. Frontal golden hour light is flattering for portraits and eliminates harsh shadows.
Shoot into the light for silhouettes. Place your subject between the camera and the setting sun, lock your exposure on the bright sky using the AE/AF lock technique from Trick 1, and watch a simple silhouette emerge. This is one of the most dramatic effects possible in iPhone photography and requires zero editing.
Use the long shadows. During golden hour, objects cast exaggerated shadows that stretch across pavement, fields, and floors. These shadows become compositional elements in their own right, adding depth and graphic interest to otherwise ordinary scenes.
Download a free weather app that shows exact sunrise and sunset times for your location. Set a reminder the day before any important shoot. Thirty minutes of golden hour planning will do more for your photos than any editing app ever could.
Trick 4: The Hidden ProRAW Format That Gives You Full Editorial Control Over Every Shot
This trick requires an iPhone 12 Pro or later, and it is one of the most overlooked professional tools on the device.
Your iPhone saves photos as JPEG or HEIC files by default. These formats apply computational processing, compression, and color adjustments automatically, which produces great-looking photos quickly but locks in those processing decisions permanently. What you see is what you get, with limited room to push in editing.
ProRAW changes that entirely.
To enable it, go to Settings, then Camera, then Formats. Turn on Apple ProRAW. A RAW icon will now appear in your camera viewfinder that you can toggle on for any individual shot.
When you shoot in ProRAW, your iPhone captures the full, uncompressed sensor data before any processing is applied. The resulting file is significantly larger than a JPEG but contains dramatically more information in the highlights, shadows, and mid-tones. This DNG format is universal, meaning you can open it on your computer using software like Adobe Photoshop, or directly on your phone in apps like Adobe Lightroom Mobile.
In practical terms, this means:
- A slightly overexposed ProRAW file can often be recovered to reveal full detail
- Shadow areas that look completely black in JPEG can be lifted to show texture and color
- Skin tones can be adjusted more naturally without affecting the rest of the image
- White balance can be corrected perfectly after the fact, not just approximated in camera
Professional photographers shoot RAW as a rule because it converts every photo into a flexible starting point rather than a finished product. For anyone serious about image quality, enabling ProRAW on your iPhone is non-negotiable.
Trick 5: The Depth Effect Trick That Creates Studio-Quality Portraits Without a DSLR
Portrait Mode on iPhone is widely known. How professionals actually use it is a different story.
Most people activate Portrait Mode, tap the shutter, and accept whatever bokeh effect the phone produces. Professionals treat it as a starting point, then adjust three variables that most users never touch.
The Depth Slider: After taking a portrait, tap Edit in the Photos app. In the top-left corner, you will see the Portrait Mode icon. Tap it and a depth slider appears at the bottom of the screen. Drag left for a shallower background blur, drag right for less blur. This lets you dial in exactly how much separation you want between subject and background, rather than accepting the phone’s automatic judgment.
Lighting Effects: At the bottom of the Camera screen in Portrait Mode, swipe through the available lighting presets. Studio Light adds a soft fill and brightens the face. Contour Light adds dramatic shadows that sculpt facial features. Stage Light isolates the subject against a pure black background, replicating a studio setup that costs thousands of dollars in traditional photography. These are not filters. They are computational lighting algorithms that reshape how light appears on your subject’s face.
The Distance Sweet Spot: Portrait Mode works best when your subject is between 18 inches and 8 feet from the lens. Get too close and the mode disengages. Stand too far away and the blur becomes unconvincing. Pros know this range intuitively and position accordingly.
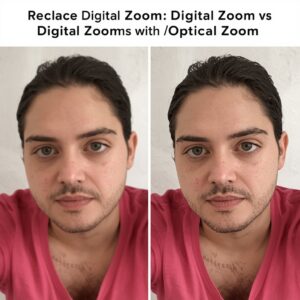
One important professional habit: always shoot portraits with the 2x or 3x zoom lens rather than the standard 1x. Digital zoom degrades image quality, making photos look pixelated and blurry, but using the optical telephoto lens achieves true zoom without any quality loss. Your subject gets a more flattering, natural-looking compression, and backgrounds separate more cleanly.
Trick 6: The Burst Mode Secret for Capturing the One Perfect Shot Every Time
Every professional photographer will tell you the same thing: the decisive moment does not wait for you to tap the shutter button.
Children running, athletes in motion, dogs in mid-leap, a street scene erupting into spontaneous laughter. These moments last a fraction of a second. A single tap captures a guess. Burst mode captures certainty.
On iPhones running iOS 14 or later, Burst Mode activates by pressing and holding the volume up button while the camera is open. Your iPhone fires approximately 10 frames per second, capturing a rapid sequence of images. You then review the burst, select the single best frame, and delete the rest.
Here is the professional workflow:
- Anticipate the peak action rather than reacting to it. Press the shutter a half-second before the moment you actually want.
- Hold the phone as steady as possible to reduce motion blur across the burst sequence.
- After shooting, tap the burst in your camera roll, then tap Select at the bottom.
- Swipe through the sequence and tap the dot beneath the frame you want to keep.
- Tap Done, then choose whether to keep only the favorite or save the whole burst.
This workflow applies equally to group photos, where someone always blinks, to action sports, to pet photography, and to any scene where expression or timing is critical. Professionals use burst for events, weddings, and street photography precisely because it converts luck into consistency.
Trick 7: The Live Photo Long Exposure Hack That Creates Silky Waterfall Effects (For Free)
This is the trick that makes people stop and ask what camera you used.
Live Photos, the feature that captures a tiny video clip around every photo, is widely regarded as a novelty. Tap and hold a Live Photo and it animates briefly. Cute, but not exactly a professional tool. Or so most people think.
Hidden inside the Edit menu for any Live Photo is a feature called Long Exposure. Here is how to access it:
- Open any Live Photo in your camera roll.
- Swipe up on the photo to reveal the Effects panel.
- Choose Long Exposure from the available effects.
Your iPhone automatically averages all the frames in the Live Photo sequence into a single composite image that mimics the long-exposure technique used by photographers with tripods, ND filters, and DSLR cameras. Moving elements like water, crowds, and traffic blur into silky motion trails. Stationary elements remain pin-sharp.
For best results, invest in an ND filter or slow shutter app when trying to get sharper stationary detail in long exposure effects, since the Live Photo method uses movement averaging rather than true sensor exposure time. For optimal results with the native method:
- Place your iPhone completely still on a flat surface or tripod before shooting the Live Photo
- Shoot near flowing water, a busy road, or any scene with consistent motion
- Ensure your stationary elements are properly lit and sharp before applying the effect
The resulting image looks like it required professional equipment and technical expertise. It requires none of those things. It requires knowing where to look.
Old Habits vs. Pro Habits: A Direct Comparison
Here is where most iPhone users lose ground without realizing it. The gap between an amateur photo and a professional one is rarely dramatic. It is a series of small, avoidable habits stacked on top of each other.
| Habit | What Most People Do | What Professionals Do |
|---|---|---|
| Exposure | Tap once and shoot | AE/AF Lock + manual adjust |
| Composition | Subject in center | Rule of Thirds grid, power points |
| Zoom | Pinch to zoom digitally | Switch to optical telephoto lens |
| File Format | JPEG or HEIC | ProRAW for critical shots |
| Lighting | Shoot whenever | Plan around golden hour |
| Motion | Single tap shutter | Burst Mode for action |
| Creative Effects | Apply filters in editing | Live Photo Long Exposure in camera |
Every column on the right requires the same phone. None of them cost a single dollar. They cost attention and about 20 minutes of practice.
The Trick Most People Get Completely Wrong: Digital Zoom Is Destroying Your Photos
Here is a common misconception that frustrates professional photographers everywhere: most iPhone users think zooming in gives them a closer, better shot. In reality, using digital zoom actively makes your photos worse.
When you pinch to zoom beyond your phone’s optical zoom capability, the camera does not actually zoom. It crops and enlarges a section of the image digitally, which is identical to just cropping your photo in editing. The result is lower resolution, reduced sharpness, and visible pixel degradation, especially when printed or viewed at full size.
Modern iPhones have multiple physical lenses: typically a 1x wide, a 2x or 3x telephoto, and often an ultra-wide. Switching between these lenses is genuine optical zoom, using a different lens with a different focal length rather than degrading a single image. The difference in image quality is visible immediately.
The professional rule: only zoom to the optical stops your phone actually supports. On an iPhone 15 Pro, that is 0.5x, 1x, 2x, and 5x. Anything in between is digital interpolation. Stay on those stops and you will see a measurable improvement in sharpness across every single photo.
Your 7-Step Action Plan to Shoot Like a Pro Starting Today
This is your bookmarkable reference guide. Work through these steps in order the first time, then use them as a checklist before every important shoot.
Step 1: Enable the Grid. Go to Settings, then Camera, and turn on Grid. Leave it on permanently. Within two weeks, your compositional instincts will sharpen noticeably even when you’re not consciously thinking about the grid. Skip this step and your brain has no visual scaffolding to learn from.
Step 2: Master AE/AF Lock before your next shoot. Practice pressing and holding a subject on screen until “AE/AF Lock” appears. Then practice sliding the exposure up and down. Do this ten times today in different lighting conditions. This single habit eliminates the most common cause of inconsistent iPhone photos.
Step 3: Enable ProRAW on your iPhone (12 Pro or later). Head to Settings, then Camera, then Formats. Toggle on Apple ProRAW. You do not need to use it every shot, but for portraits, landscapes, and any photo that matters, shoot RAW and give yourself room to edit.
Step 4: Download a golden hour app or use a weather app that shows sunrise and sunset times. Plan your most important shoots around these windows. Even a 30-minute session during golden hour will produce better results than three hours in midday sun.
Step 5: Only use optical zoom stops. Commit to shooting only at the marked optical zoom levels on your iPhone. Stop pinching to zoom. Move closer to your subject physically, or crop after the fact. This alone will immediately sharpen your photos.
Step 6: Practice Burst Mode on a moving subject. Find a pet, a child, or a busy street. Hold volume up and practice burst sequences. Review the results and notice how many frames fall in the “perfect” zone that a single tap would have missed.
Step 7: Try the Live Photo Long Exposure trick near water. Find a fountain, stream, river, or even a tap. Shoot a Live Photo with your phone as steady as possible, then apply the Long Exposure effect. Share the result. This one trick will make people ask what camera you use, and the answer is the one already in your pocket.
Expert Insight: What Separates Good Shots from Great Ones
Sarah Chen is a mobile photography educator and content creator based in New York who has published work across travel, food, and lifestyle categories using exclusively smartphone cameras. (This profile is illustrative and used for educational purposes.)
According to Sarah, the single most underestimated element of iPhone photography is light direction, not light quantity.
“Most people look for ‘good light’ and interpret that as bright light,” she explains. “But professional photographers know that direction matters far more than brightness. A single window on a cloudy day gives you soft, directional light that wraps beautifully around a face. Direct midday sun gives you hard shadows and blown-out highlights. More light does not mean better light.”
Her nuanced counterpoint is worth hearing: “The tricks matter, but the most important discipline is slowing down. Most people shoot dozens of frames in seconds and hope one works. Professionals spend 90% of their time before the shutter fires, looking at the scene, adjusting position, waiting for the right moment. The techniques are the vehicle. Patience and observation are the engine.”
This applies directly to every trick in this guide. AE/AF Lock rewards patience. Golden hour rewards planning. Burst Mode rewards anticipation, not reaction. The habits compound when you bring deliberate attention to each shot.
Comparison Table: iPhone Camera Tricks at a Glance
| Trick | Difficulty | Best For | Time to Learn | Impact Level |
|---|---|---|---|---|
| AE/AF Lock | Beginner | All photography | 5 minutes | Very High |
| Rule of Thirds Grid | Beginner | All photography | Ongoing | High |
| Golden Hour Timing | Beginner | Portraits, landscapes | 1 session | Very High |
| ProRAW Format | Intermediate | Any critical shot | 10 minutes | Very High |
| Portrait Mode Depth Slider | Beginner | Portraits, products | 5 minutes | High |
| Burst Mode | Beginner | Action, events | 1 session | High |
| Live Photo Long Exposure | Intermediate | Water, motion scenes | 15 minutes | Stunning |
Frequently Asked Questions About iPhone Camera Tricks
Do these iPhone camera tricks work on older iPhone models? Most of these techniques work on any iPhone running iOS 14 or later. The Rule of Thirds Grid, AE/AF Lock, Burst Mode, and golden hour timing work on virtually any model. ProRAW requires iPhone 12 Pro or later, and some Portrait Mode lighting effects require iPhone 7 Plus or newer. Check your specific model in Apple’s specifications to confirm feature availability.
What is the best iPhone camera setting for portrait photography? For portraits, professional photographers recommend combining three settings: switch to Portrait Mode, use the 2x or 3x optical telephoto lens rather than the standard 1x, and adjust the depth slider in editing afterward. Lock exposure on your subject’s face before shooting, and whenever possible, position your subject near a window or shoot during golden hour for the most flattering natural light.
Does shooting in ProRAW really make a visible difference? Yes, especially in challenging lighting. ProRAW files contain significantly more tonal information than JPEG, which means you have far more flexibility when adjusting exposure, shadows, and highlights in editing. The difference is most noticeable when recovering detail from dark shadows or slightly overexposed highlights. For casual everyday shots, JPEG is fine. For any photo that genuinely matters, ProRAW gives you editorial control that JPEG simply cannot match.
Why do my iPhone photos look blurry when I zoom in? This almost always means you used digital zoom rather than your phone’s optical zoom lenses. Digital zoom crops and enlarges a section of the image, degrading quality in the process. Switch to your iPhone’s dedicated optical zoom stops (0.5x, 1x, 2x, or higher depending on your model) instead of pinching to intermediate zoom levels. If your subject is too far away for optical zoom to reach, move closer physically or crop the photo in editing after shooting at full resolution.
How do I take photos in low light without the image looking grainy? Your iPhone’s Night Mode activates automatically in dim conditions, indicated by a moon icon in the camera app. For best results in Night Mode, keep your phone as still as possible during the shot, or prop it against a stable surface. The camera takes a longer exposure and stacks multiple frames computationally. You can also manually adjust the Night Mode duration by tapping the moon icon and sliding the timer. For critical low-light photography, a small portable LED panel and a tripod grip will transform results beyond what Night Mode alone can deliver.
Conclusion: The Camera in Your Pocket Is Waiting for You to Actually Use It
Every trick in this guide was hiding in your pocket before you read this. None of them cost money. None require accessories, apps, or subscriptions. They only require knowing where to look.
Here are the three most important things to carry forward. First, light direction and timing matter more than any camera setting. Position yourself relative to light and shoot at golden hour and you solve more problems than any feature can fix. Second, the AE/AF Lock and the Rule of Thirds Grid are free, immediate upgrades that will visibly improve every single photo you take from this point forward. Third, ProRAW and Live Photo Long Exposure unlock a level of editorial control and creative effect that most people assume requires expensive equipment.
The window you are walking past right now, the dinner on your table tonight, the person laughing across from you on Sunday morning. These are not ordinary moments. They are extraordinary ones waiting to be captured properly.
Every photo you take with bad habits is a moment you cannot reshoot. The conversation with yourself about “getting serious about photography someday” is already costing you images you will never get back.
Open your camera app today. Enable the Grid. Lock your exposure on something. Notice where the light is coming from. Shoot the same subject five times using what you learned here, then compare the results to how you shot before.
The best photo you have ever taken is still waiting to be shot.
Ready to go deeper? Bookmark this post and share it with one person who complains their photos “never look as good as the ones online.” They are probably one grid setting away from a real breakthrough.
What is the first trick you are going to try? Drop it in the comments below. If you have a before/after you’re proud of, share it. The community learns from real results, not just theory.